Introduction
The PI Cobbler (made by Adafruit) is a great tool that is used to connect a Raspberry PI to a bread board.
An alternative is to use an Arduino Nano that fits directly on the breadboard
 |
| PI Cobbler |
The Arduino Uno board on the other hand is not so straight forward to connect to a breadboard. You often end up with a mess of many wires
 |
| Arduino Uno requires individual wires towards the breadboard |
 |
| Arduino Nano fits directly on Breadboard |
Assembly instructions
Needed stuff
You will need
- A PI Cobbler
- A 2x40 Positions Header, Breakaway Connector 0.100" (2.54mm) Through Hole
- An Arduino Uno
- An Arduino Protoshield (I use the one from Adafruit)
- Some cabling wire
- Some solder
STOP DON'T USE THE ADAFRUIT PI COBBLER!! it is only intended for the Raspberry PI. It contains internal wiring that connect all the Raspberry PI GND together this may damage your Arduino and / or prevent your project from working
Building the adapter
Assemble the protoshield kit
Break the pin header
We will use a 34 (2x17 pins) so break the pin header to this length and solder it on the protoshield
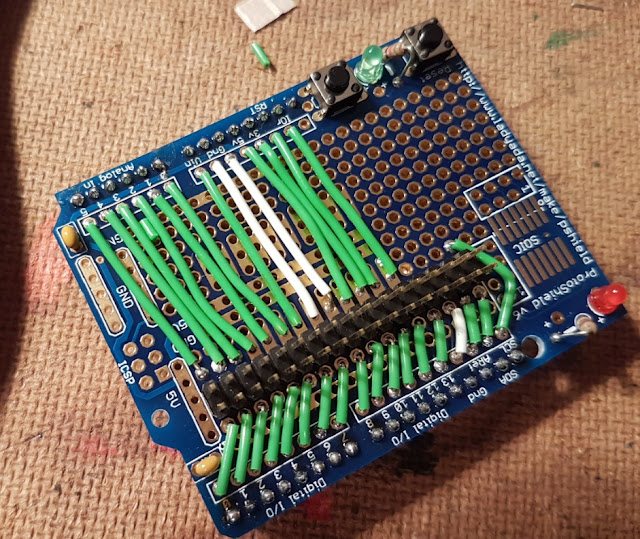
Solder the pin header on the protoshield at the specified place
Solder each output pin of the Arduino Uno connectors to the pin header
This is the view from below. as you can see the soldering work is very limited
Now you can take a flat cable (e.g. the one from the PI cobbler DO NOT USE THE PI COBBLER! it will short some Arduino signals) and connect it directly to the Arduino Uno.
Et voila! you have an "Arduino Cobbler".
The Pinout
This is the pin out of the Arduino Uno on the PI cobbler.DO NOT USE THE PI COBBLER
They are organized exactly as on the Arduino except for the SCL that had to go on the other side because there was not enough pins on the left side.


No comments:
Post a Comment